Well I was going to leave this post for next week, but I am going to be very busy both at work and college and probably away from blogland for a while too!
so I thought I'd be good and give you a surprise...
Anava a deixar aquet post per a la setmana que ve, pero estare molt ocupada a la feina i a la universitat i segurament tampoc parare per terres virtuals!
aixi sue us deixo una sorpresa...
Many people asked me for this tutorial (as I promised) when they saw this I finally could put a tutorial together for these little baskets. The one on the left I started a while ago (when I started the tutorial), then life got in the way and I had to put it on the back burner...
but hey, I got two of them!
So let's get started
Per fi he pogut enllestir aquesta tutorial que tanta gent m'ha demanat quan van veure
aquest cistell (ja ho se, encara em falta el Mic!). El cistellet de l'esquerra el vaig comenc,ar fa temps (quan vaig comenc,ar a preparar la tutorial),
pero hi ha coses que passen a la vida i has de deixar-ne altres de banda...
al menys ara en tinc dos de fets...
Anem per feina
MATERIALS
linen
fabric for the lining
fusible medium weight interfacing
fabric scraps
MATERIALS
lli
tela per al forro
entretela (de la que s'enganxa quan la planxes) de pes mig
trocets de teles variades
1. Cut 1 rectangle 7 1/2"x 16 1/2" from linen, lining fabric and interfacing.
Cut a circle of 5 1/2" diametre from linen, lining fabric and interfacing.
Iron the interfacing on the wrong side of the linen.
1. Talleu 1 rectangle de 7 1/2"x16 1/2" de cada tela, lli, forro i entretela.
Talleu un cercle de 5 1/2" de diametre tambe de cada tela.
Planxeu l'entretela a la part del reves del lli.
2. Decide on a design for your basket. I cut flowers from scraps and ironed interfacing on their wrong side. You can see here two examples: flowers,
or tiny clothes and two poles for hanging sewing them up on the line...
Use your imagination, I'm sure you'll make something beautiful!
2. Decidiu quin diseny voleu i retalleu figures amb les teles variades. Aqui teniu un exemple amb flors i un altre amb roba i dos pals per estendre-la cosir-la...
Feu servir la imaginacio, segur que us surt alguna cosa molt maca!
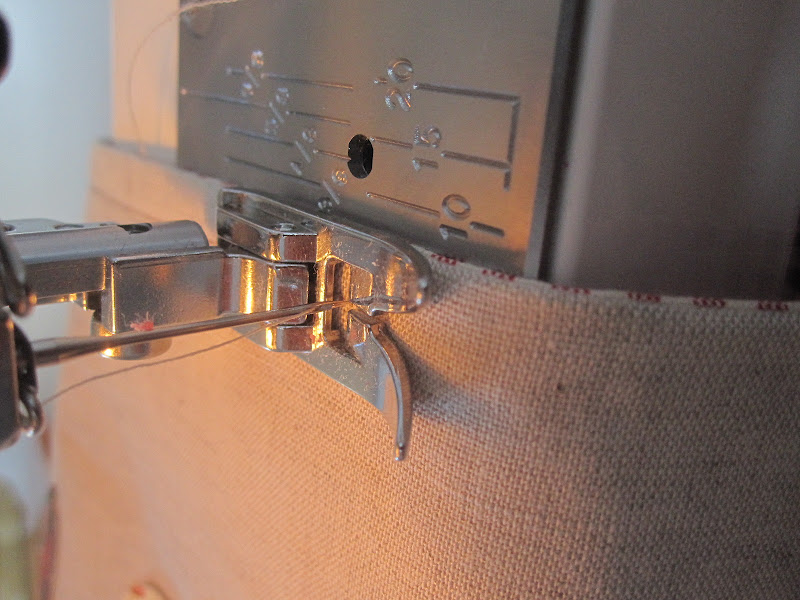
3. Arrange the shapes on the right side of the linen and sew them using a straight stitch, blanket stitch or any that you feel comfortable with. Here I used a straight stitch for the flowers, a zig-zag for the stems, and using my darning presser foot I sew the leaves.
3. Col.loqueu els retalls a sobre del lli amb l'ajuda d'agulles. Feu servir un punt recte, zig-zag, d'aplic... el que us sembli mes be per al que feu. Aqui he fet servir un punt recta per cosir les flors, un de zig-zag per als talls i he utilitzat la pota d'encoixinat lliure per cosir els fulles.
You may add little details like buttons or beads.
Tambe podeu afegir detalls com botons, etc.
5. Once you are happy with it, press it.
5 Un cop ho teniu llest, planxeu-ho.
6. If you are using labels, you could sew one on the centre top of the lining fabric,
about 1 1/2" form the top raw edge.
6. Si feu servir etiquetes, podeu cosir-ne una al centre del forro, a 1 1/2" per sota de la vora superior.
7. Sew the sides together leaving a 1/2" seam and press it open, making a tube.
Do the same with the linen panel.
7. Cosiu els costats dels rectangles deixant una vora de 1/2", formant un tub, i planxeu la vora oberta.
Feu el mateix amb el rectangle de lli decorat.
8. Attach the circular bottom to the bottom of the tube (right sides together)
using as many pins as you need.
8. Amb l'ajuda de tantes agulles com necessiteu, col.loqueu la base circular
a la part inferior del tub (amb les parts dels dret tocant-se).
9. With the bottom of the basket facing down,
sew around the circular edge leaving a 1/4" seam (roughly).
9. Amb la base circular cap avall, cosiu el voltant deixant una vora de mes o menys 1/4".
10. Cut around the seam with pinking shears scissors
or just cut tiny snips every 1/2" being careful not to cut through the stitches.
Repeat steps 8-10 with the lining fabric.
10. Talleu al voltant de la vora amb unes tisores de zig-zag, i si no en teniu, nomes cal que feu petits talls a cada 1/2" mirant de no tallar cap punt.
The following step is optional:
El seguent pas es opcional:
Place a bit of velcro on the ouside of the linen basket,
just over the seam and above 1 1/2" below the top edge.
Col.loqueu un troc, de velcro a la part exterior del cistell de lli, sobre la costura lateral i a 1 1/2" per sota de la vora superior.
Cut a (roughly) 5" square of lining fabric
(or linen if you prefer).
Press the edges on both sides about 1/2" inwards,
and one of the narrow sides 1/4" inwards (sorry, forgot to take that shot!)
Talleu un quadrat de mes o menys 5" de tela de forro
(o lli si voleu).
Doblegueu els costats 1/2" cap endins i planxeu. Feu el mateix amb un dels costats estrets que us queda, pero aquest cop 1/4" (aqui m'he deixat de fer la foto)
Fold it in half, lengthwise, and sew along the edge
about 1/8" of the edges.
Sew the other bit of velcro on one end.
Doblegueu per la meitat, al llarg, i cosiu al voltant
deixant 1/8" de marge.
Cosiu l'altra part del velcro a una punta.
11. Now place the lining inside the linen basket, wrong sides together,
and make sure both seams are aligned.
11. Col.loqueu el forro dins del cistell de lli, amb les parts del reves tocant-se,
i assegureu-vos de que les costures quedin aliniades.
12. Fold the top edges 1/2" onto their wrong side and pin together.
12. Doblegueu la vora de dalt, dels dos cistells, 1/2" cap a les respectives parts del reves
i col.loqueu agulles a tot al voltant.
13. Place the velcro strap between the two fabrics and pin it to place.
Topstitch all around about 1/4" from the edge.
13. Col.loqueu a lloc la tira amb velcro entre les dues teles.
Cosiu un repunt a tot el voltant deixant 1/4" de marge.
Alternatively, if you're not using any straps,
a quicker way to stitch the top is by placing the lining inside the linen basket
RIGHT SIDES TOGETHER.
(You could add your straps by placing them in between the two right sides)
Una altra alternativa mes facil, i sense tires per penjar, es col.locant el forro dins del cistell de lli pero aquest cop amb les PARTS DEL DRET TOCANT-SE.
(Podrieu afegir tires si les col.loqueu entre les teles)
Stitch along the top leaving 1/2" seam and
making sure you LEAVE A GAP of about 4".
Cosiu tot el voltant deixant una vora de 1/2" i DEIXANT UN ESPAI SENSE COSIR d'unes 4".
Turn the basket inside out through the gap you left so now both right sides are facing out.
Gireu la tela passant-la per l'espai sense cosir de manera que les cares del dret quedin a fora.
Place the lining inside the linen basket and topstitch at 1/4" form the edge.
Feu un repunt al voltant deixant un marge de 1/4".
It looks cute if you fold the top towards the outside.
Queda maco si gireu la part de dalt cap enfora.
And here's a cloth peg holder on the left, and a put-anything-in basket on the right...
I aqui a l'esquerra teniu el meu cistellet per guardar les agulles d'estendre, i a la dreta
un cistell de ficar-el que-sigui...
You may sell these, as long as you give me credit and link to my blog!
Thanks a million
Teniu el meu permis per vendre aquests cistells
pero us agrairia que m'acreditessiu com a disenyadora i enllac,ar-me al vostre blog!
Moltes gracies


